How To Do A Content Audit Using Free Tools [With Template]
The content audit is a process that helps you take inventory of the content you have on your (or your client’s) site and helps you understand what you should do with it.
Usually, it’s done using a bunch of paid tools. However, in this post, I will show you step-by-step how to do the content audit from start to finish using only the free tools.
Although there could be a million ways you could do an audit, my version of the audit will help you dig into the site from a user’s perspective. This will give you an idea of how the users feel about your website and how to make the content better for them.
You can make a copy of the audit template here.
(Don’t forget to copy the script too)
I recommend making any relevant changes to this template so it will help you make the most out of it. For example, you might want to track different metrics and you want to make the priority or the action list a little different. The more customized you make this template, the more it will be efficient for you to conduct audits.
This audit goes into collecting the data from different sources such as Google Search Console, Google Analytics 4, and Ahrefs Webmaster Tools. Apart from this, you would also need to do some manual poking to identify things like the page’s purpose and the reputation of the website and author.
Let’s start by understanding the goals and the metrics I will be tracking in this audit.
Table of Contents
Set your goals and determine your metrics for content audit
You know what they say, there is a reason behind doing anything. This means there must be a reason behind doing a content audit. The reason can be to improve traffic and conversions, or it can be a method of eliminating non-preforming content from your website, which is also called content pruning.
I recently performed a content audit for my website, Packted and my goal was to improve traffic on pages while removing unnecessary posts from the website.
For this, I took measured metrics like:
- Date Published/last modified
- Impressions
- Clicks
- CTR
- No of internal links
- No of backlinks
- No of views
- No of sessions
- Engagement Rate
Apart from these, I tracked other things like
- SERP overview
- Main traffic source
- Canonical tags
- Pagination
- Meta Title
- Meta Description
- H1
- Images Alt text
- Page Speed
I am a huge advocate for user-friendly SEO, so I took some inspiration from Google Search Quality Rater Guidelines, and I made a bunch of extra columns like:
- Page purpose
- User intent and does it satisfy it?
- Content Quality
And because I have a lot of articles where I ask for people’s quotes, I also added a column that lists who has given a quote.
I also keep an extra column for notes, and here I add extra things that I can’t fit into other columns, any extra insights, or links to resources.
Fill the data in the sheet
Based on your goals and the metrics you have chosen, you might want to look at a few different data sources to collect the data. For example, GSC, GA4, Ahrefs Webmaster Tools, and more.
Collect the URLs
So let’s start with the basics, and that is collecting URLs.
I thought that collecting URLs would be an easy part until I got to realize that it’s really hard to copy and paste single URLs. Luckily for us, tools like Sitemap URL Extractor exist. I found the one from SEOWL to be simple and helpful.
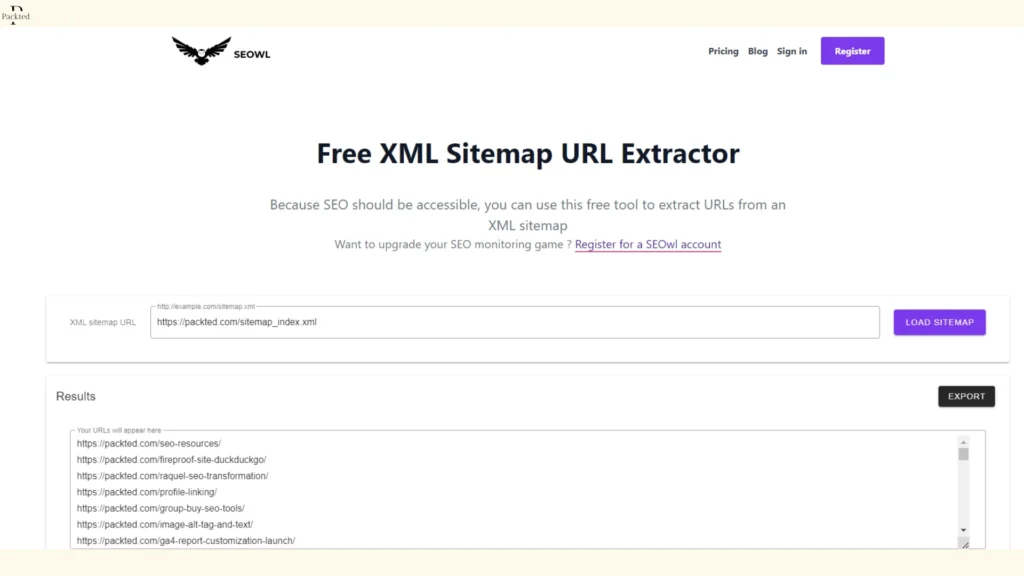
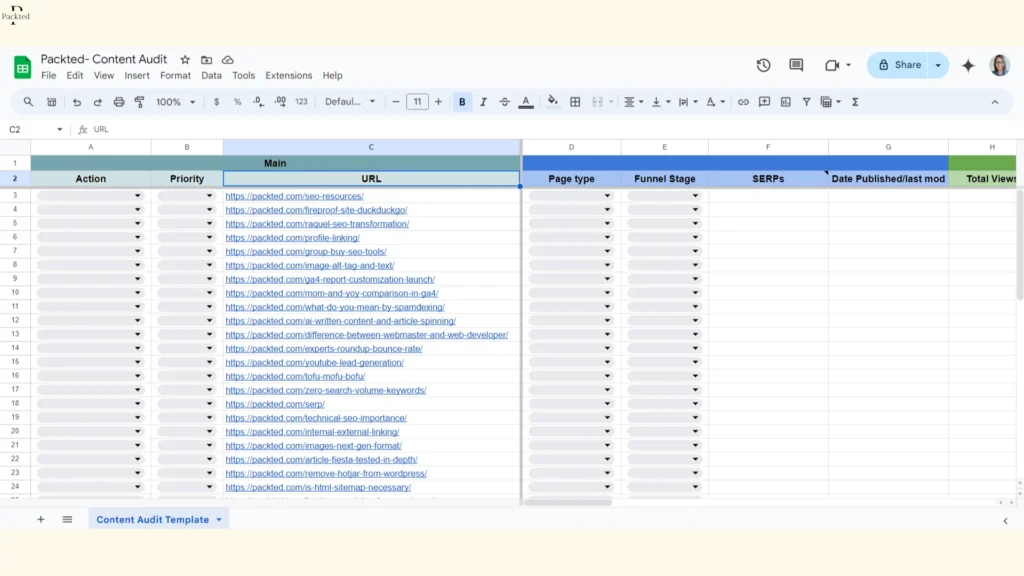
Simply add the sitemap URL and it will list all the URLs. From here, you can copy all of them, and paste them into your sheet, like this:
Page Type
The next thing (according to this template) is to determine the page type. Now, there can be a lot of page types. For example, in this template, I have written a few types that are relevant to my website. These are:
- Blog Post
- Service/product page
- Landing Page
- Category Page
- Tag Page
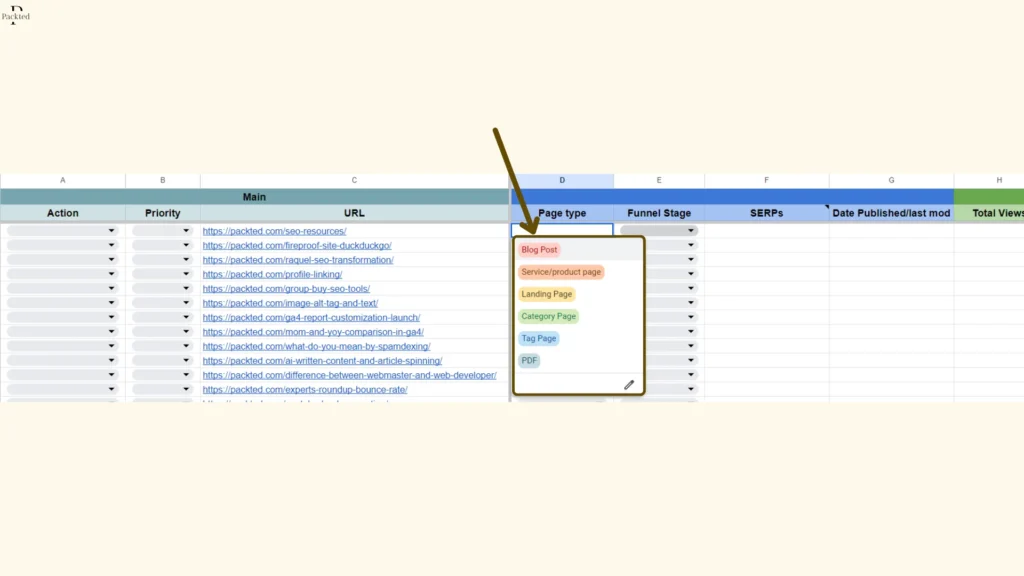
You can add or remove according to your website. The step is to fill out what each page is about.
If you want, you can go ahead and do it for all the pages, but I personally like to fill in every info about one URL and then I move to the next one.
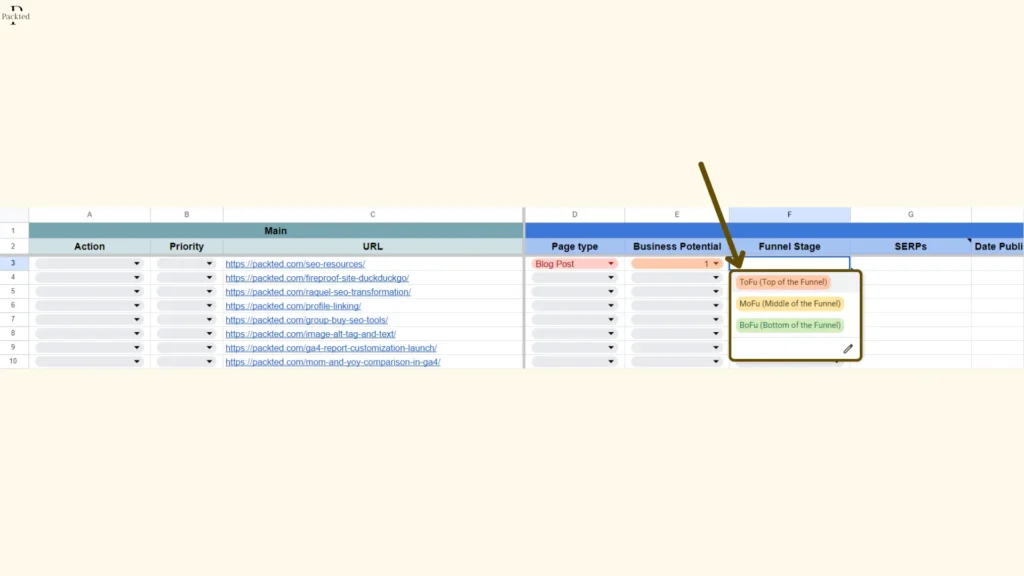
Funnel Stage
The next step is to write what funnel stage this content is in. This step will make you think from a business standpoint. You can either choose from ToFu (Top of the Funnel), MoFu (Middle of the Funnel), and BoFu (Bottom of the Funnel), or you can make it Awareness, Consideration, and Decision.
The choice is yours, but the idea is to understand how much content you have for all the funnel stages.
Here’s what it will look like:
Recommended Reading: What are ToFu, MoFu, and BoFu?
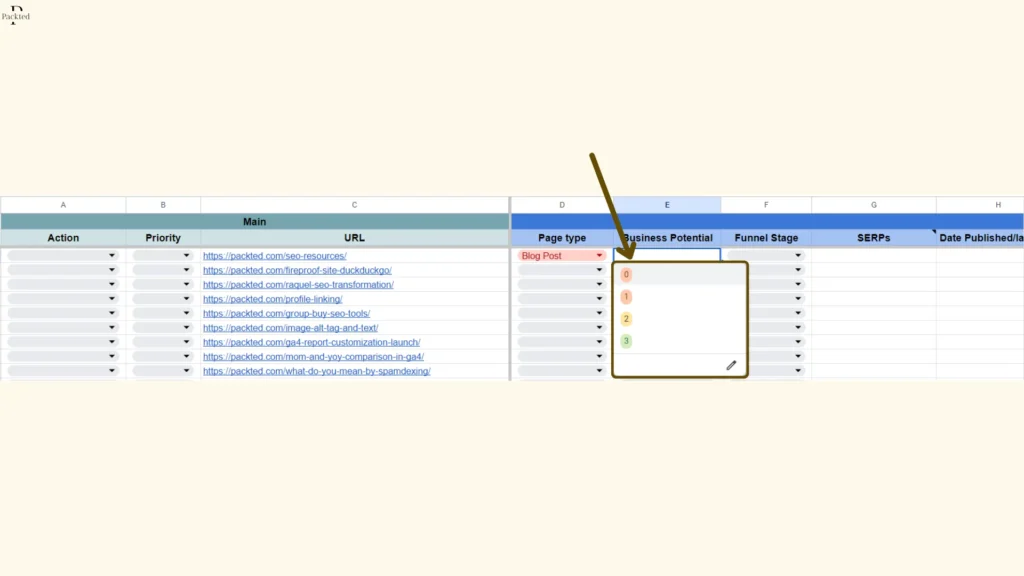
Business Potential
Here’s something I will recommend if you’re doing product-led content, or planning to do so. The idea is to assess your content on a scale of 0-3. A score of zero means that this content idea has nothing to do with your business and a score of 3 means that your product is an irreplaceable solution to the problem.
Ahrefs explains this beautifully in their product-led content guide.
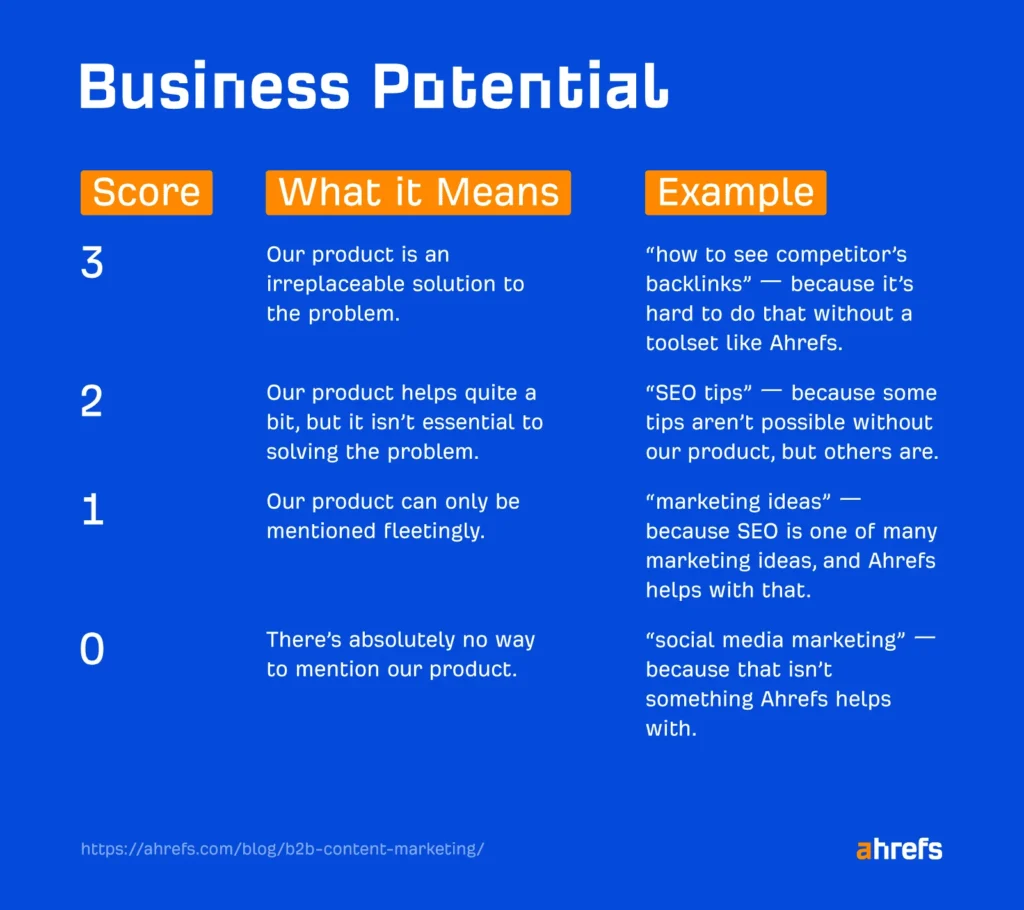
For this audit, you can make a dropdown and assign the values to each URL, like this:
SERP
The next step is to fill up what the SERPs look like. Here, I tend to write everything I see on the SERPs.
I write about things like:
- Whether SGE is present or not? (If it is present, I will write what kind of info is it showing, and any other information that I find interesting)
- Whether or not any other kind of rich result is present? (This includes things like featured snippets, sources across the web, knowledge panels, and more)
- What kind of websites are ranking? Do they have more EEAT than us? Do the articles require it to be reviewed by a professional? For example, topics related to health have a “Medically reviewed by” section.
- What kind of pages are ranking? Are all URL guides, listicles, or web stories, or is there a mix of all of them? This will help me determine the searcher’s intent. Often, I see Google is not sure what to show to the users, so it ends up showing a lot of things like listicles, product pages, guides, home page URLs, and other things on the same SERP
The idea behind doing this is to check whether or not this specific URL matches the user intent or not. It also makes us understand what kind of content Google is pushing for this query, and how we can do better.
But the question is, what phrase or topic would you add to the search bar to get the SERP data? One thing that you can do is to write the focus keyword first, which is in the Meta column (I’ll show you that later).
You should note that the focus keyword doesn’t mean that you will add this keyword over and over again in the content. This is just for you to understand what is the main term for this article. A more “generalized” topic if you may. For example, the overgeneralized topic for the page I am auditing right now can be “resources to learn SEO”.
Recommended Reading: The Ultimate Guide to SERPs
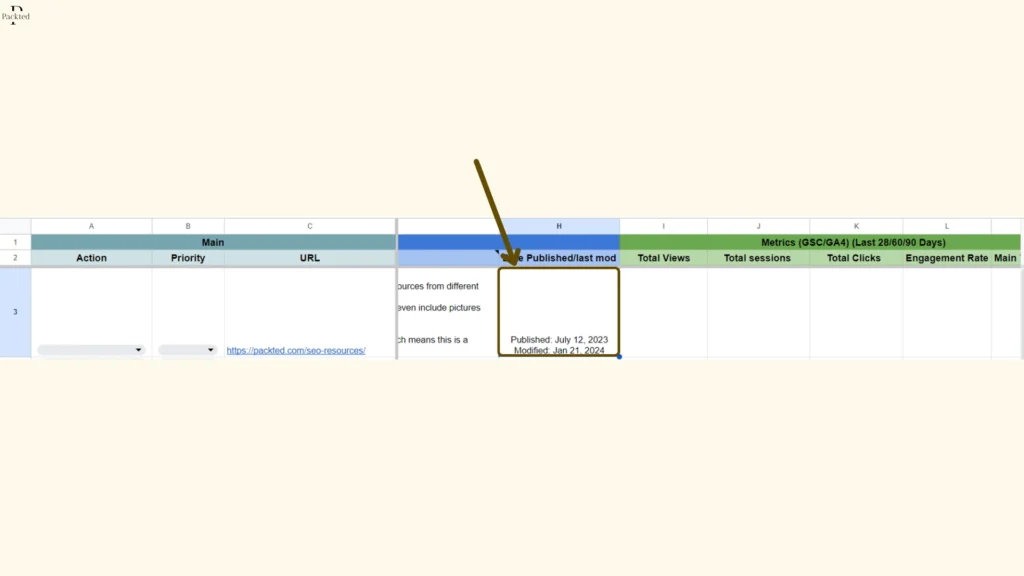
Date Published / Last Modified
The next step is to write when was this article published or last modified. The idea behind this is to assess how long it has been since the content was last modified. A lot of times it happens that you are not receiving enough traffic on a page, or you want to delete this page. In situations like these, it’s best to see how long it has been since it’s live. If it is less than 6 months old, then leave it as it is because it takes time for content to perform well.
Similarly, if the content is live for a while but it is not receiving enough traffic, you might want to check the last modified date and the SERPs to see if the intent has changed, or if there’s a need to update the article.
In my case, there is both a published date and a modified date, so I’ll write both:
GA4 metrics
Here comes a fun part. I will measure total views, sessions, engagement rate, and main traffic source for all my pages. You might want to measure different metrics according to your goals and needs.
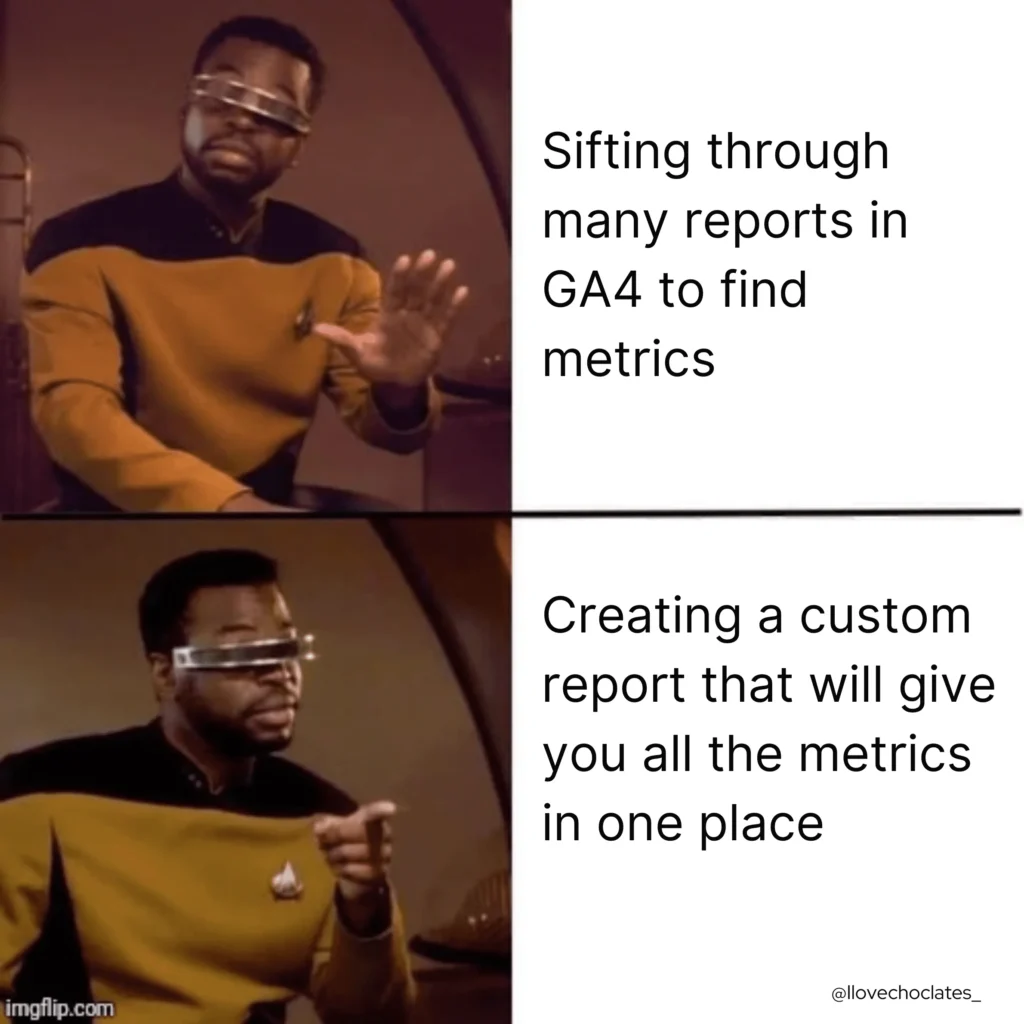
If you’re a normal person, you will sift through many reports to find these metrics. For example, you will find the Views in the Pages and Screens report, Sessions in the Traffic Acquisition and Landing Page report, Engagement rate in the User Acquisition report, and Traffic Source in the Traffic Acquisition report. It would be really hard for you to collect all the data. Good luck doing all of that!
If you’re a pro person, you will make a custom report that will show you all the metrics in one place. And this is exactly what I did.
Here are the steps to make a custom report for the same:
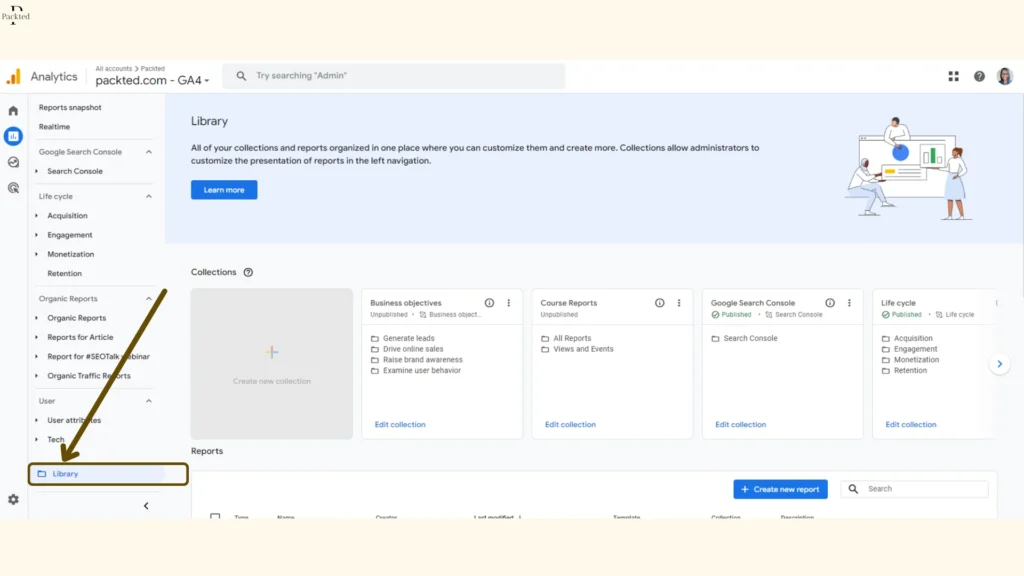
- From your GA4 property, click on Library. (You will only have this option if you’re editor or admin)
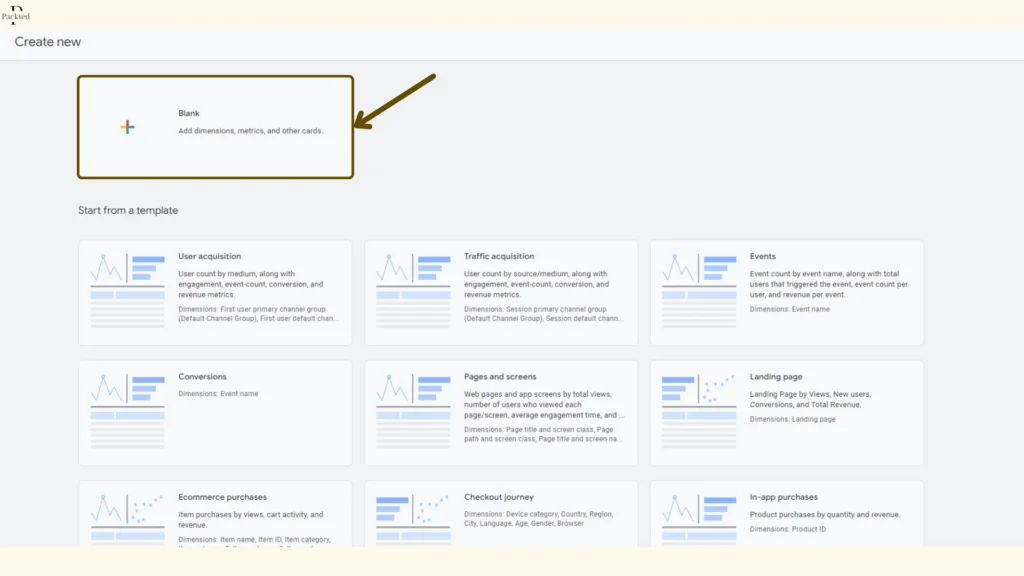
2. From here, click on “Create New Report”, and then “Click Detailed Report”

3. From here, click on “Blank”
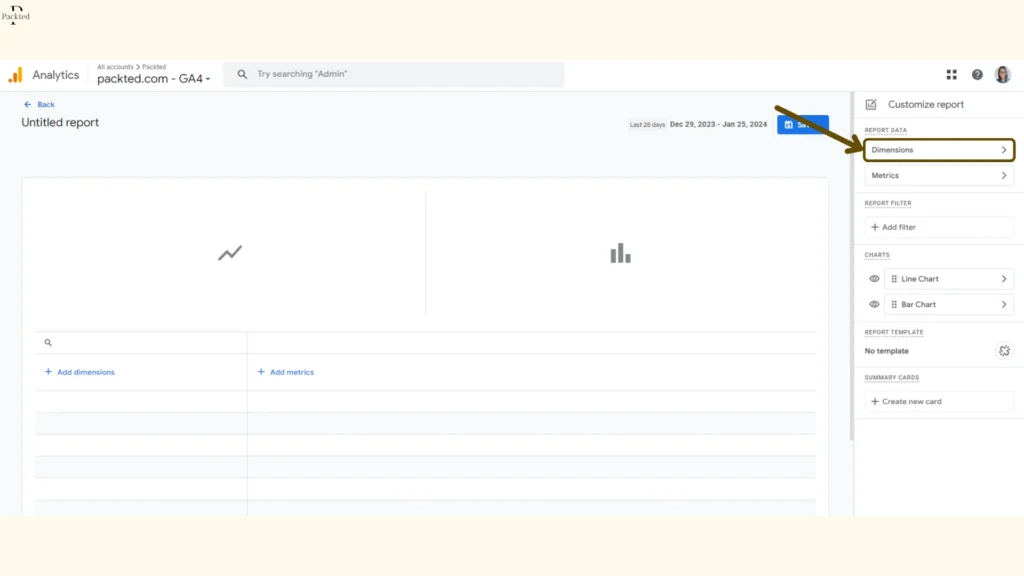
4. Click on “Dimensions”
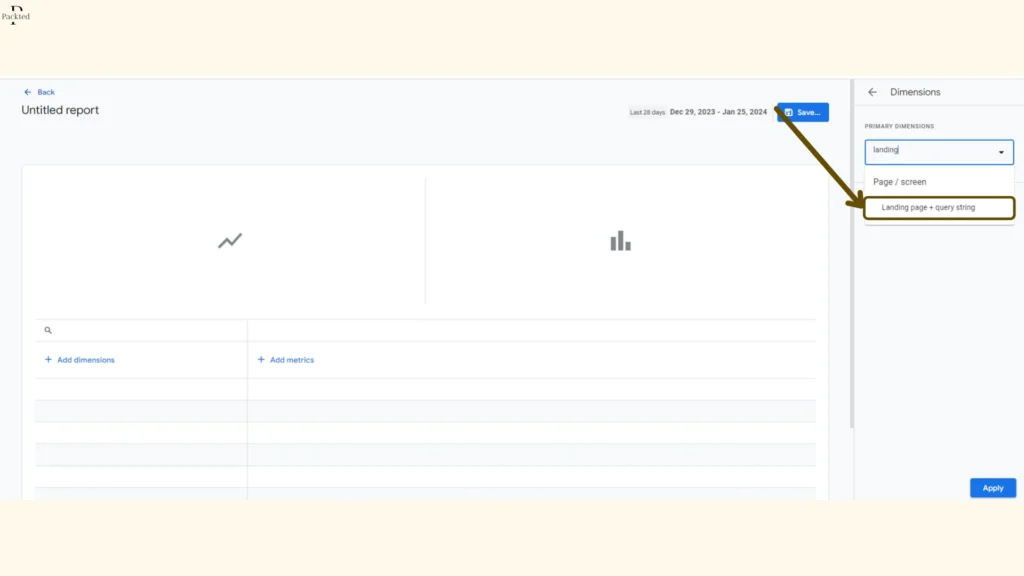
5. From here, type or select the dimension “Landing Page + Query string”
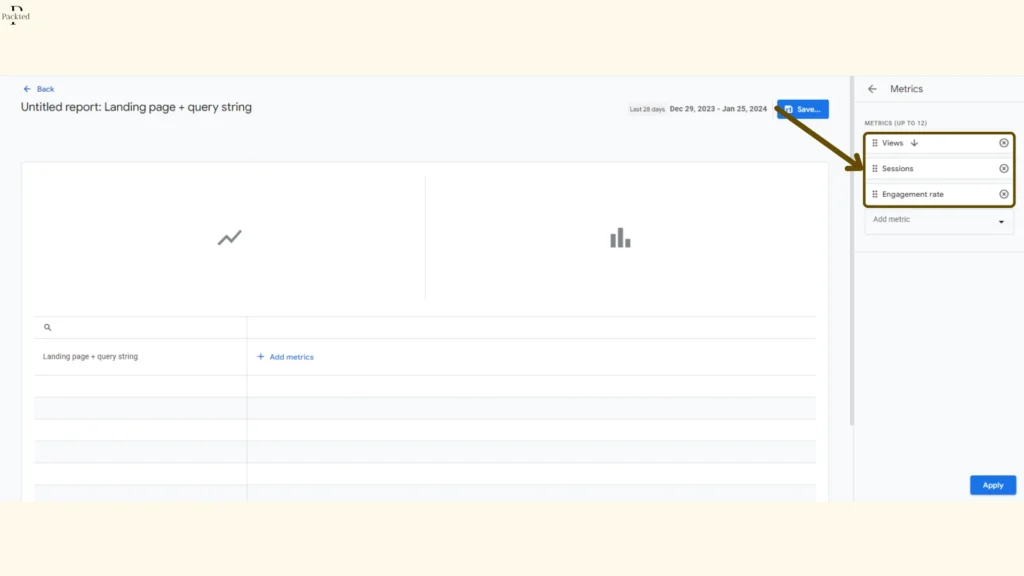
6. Click Apply and click on “Metrics”
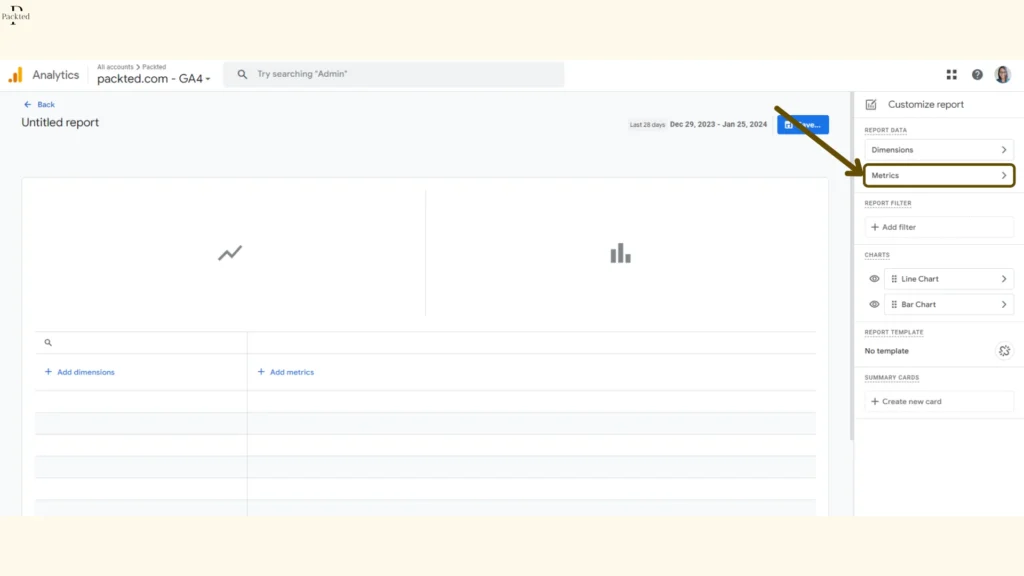
7. Choose the metrics “Views”, “Sessions”, and “Engagement rate”, and click apply. If you’re looking to add another metric, feel free to choose your preferred metrics.
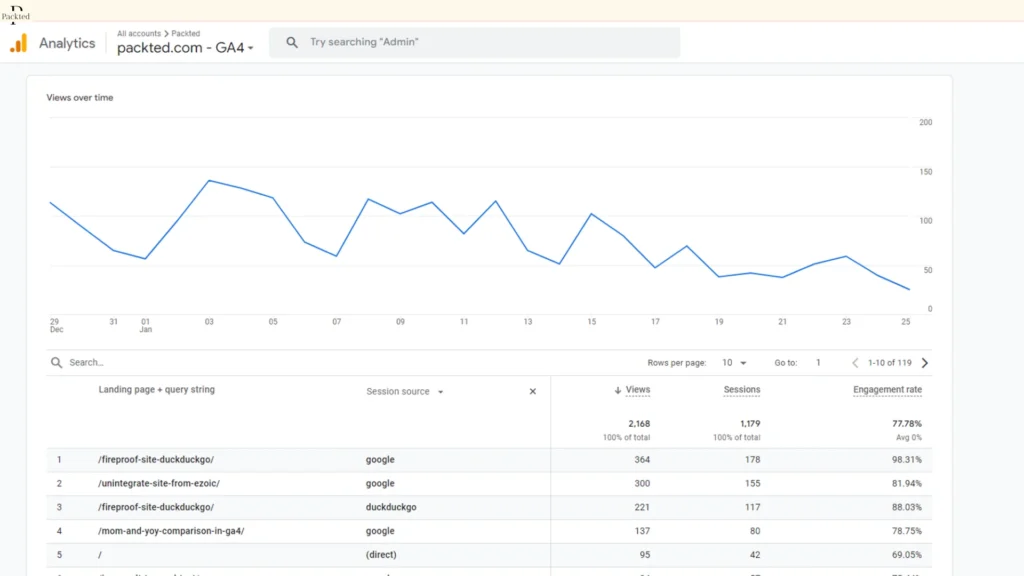
8. After doing all of that, you will see a report like this:
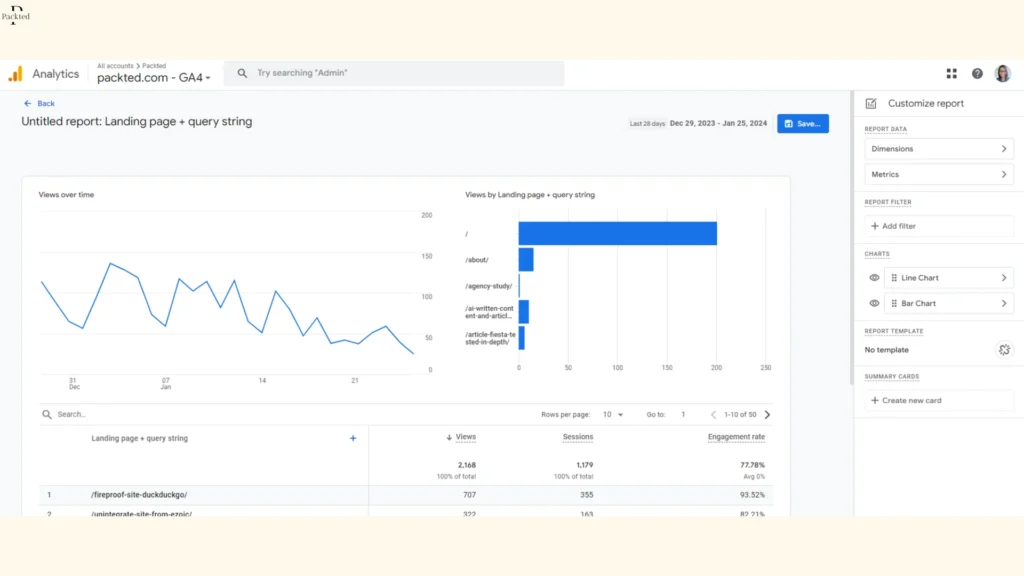
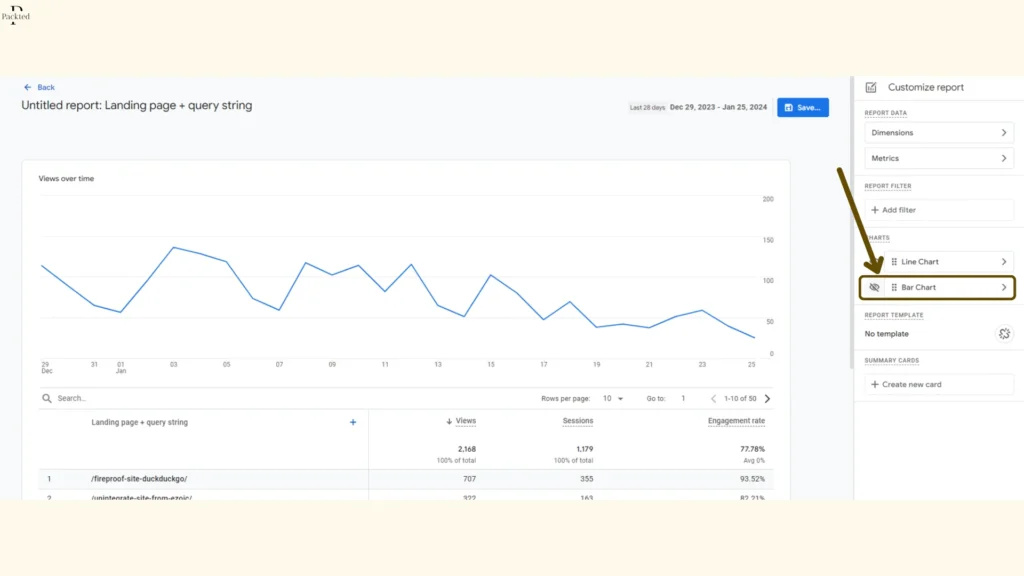
9. We are not done yet, so we’ll do some cleaning. Click on the eye icon beside the “Bar Chart”, and click it. This will leave us with only the line chart. Now it looks clean!
10. Now, we have to add a second dimension, so go ahead and click on this little plus icon on the right of “Landing Page + Query String”. This will bring up a little menu like this:
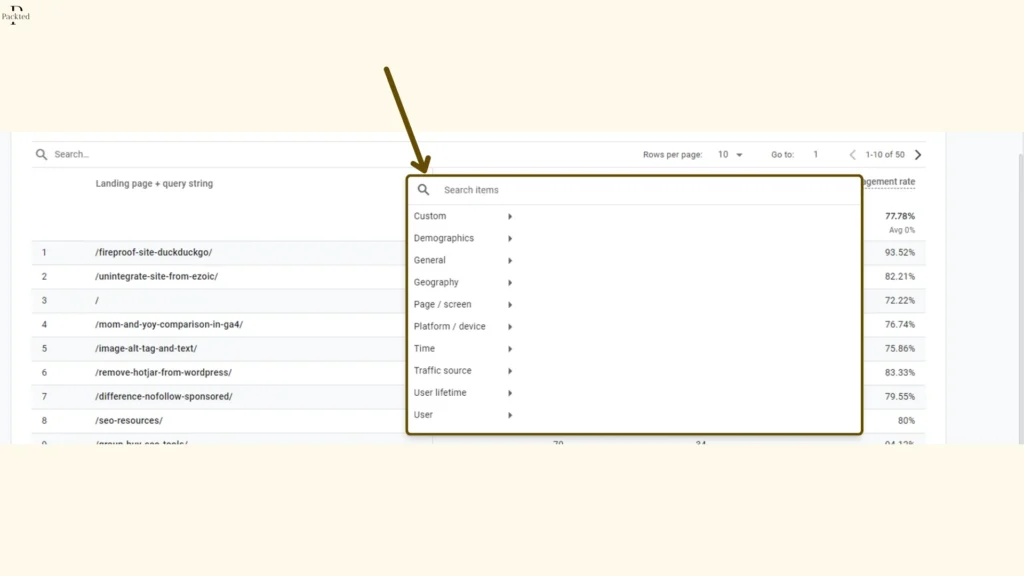
11. Click on Traffic Source > Cross-channel > and Session Source.
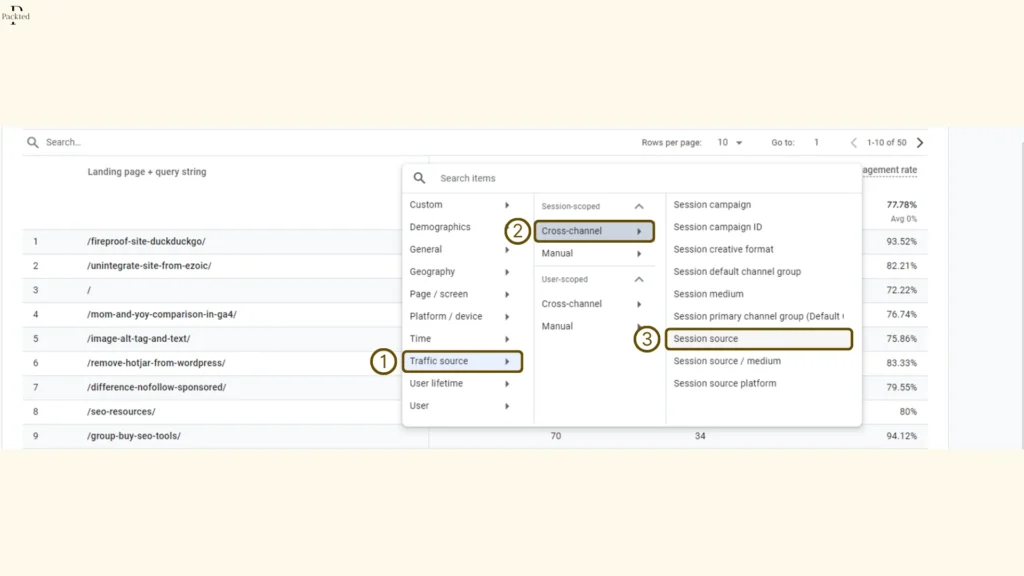
12. This will tell you where are people coming from
This looks good, but you won’t see this report in your main report sidebar yet, so you will need to do a few extra steps:
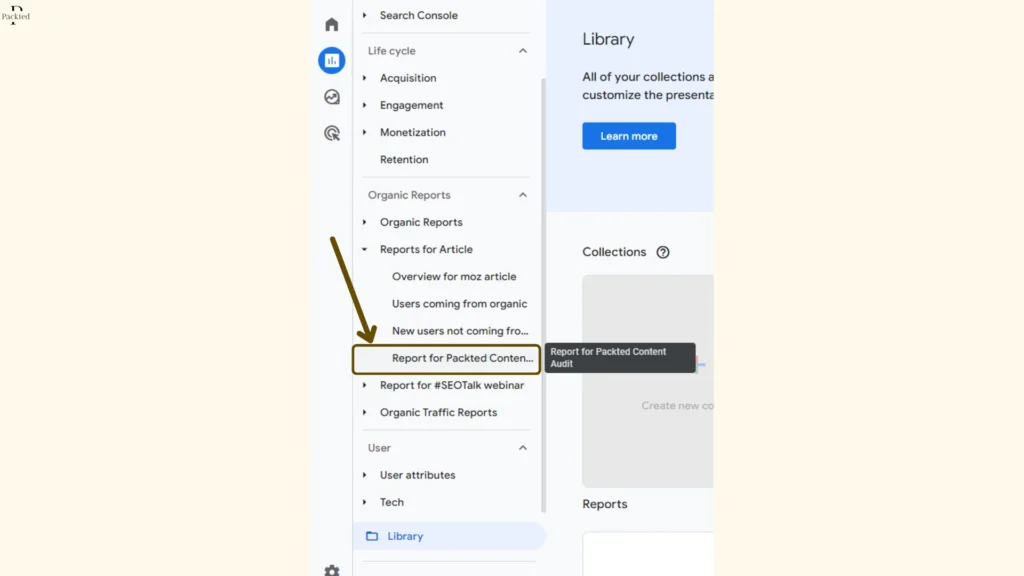
- Click on “Save”.
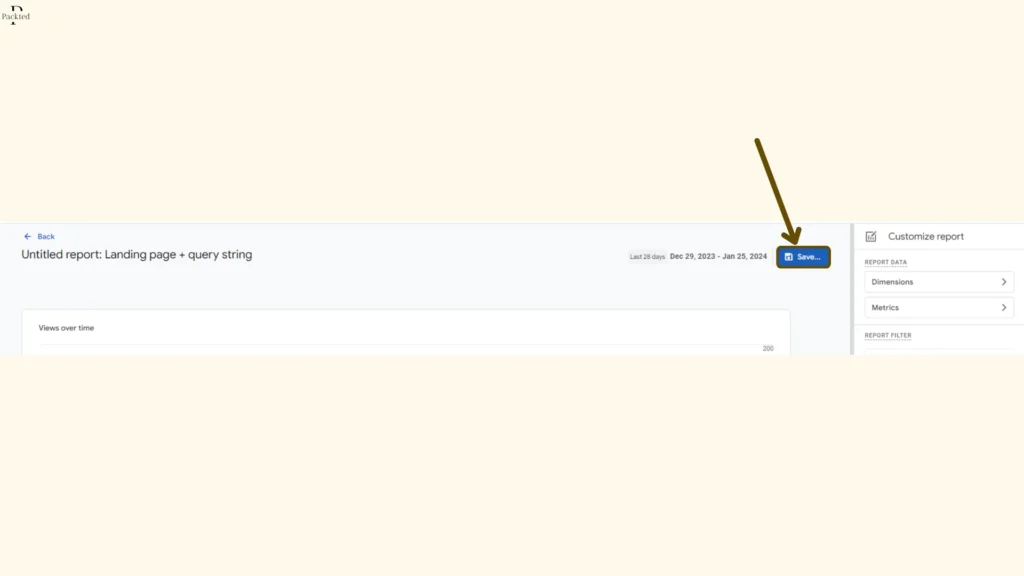
This will present you with two fields “Report name” and “Report Description”. I will add the name “Report for Packted Content Audit” so that I know why I made it. (Fun fact: I have a lot of random custom reports, and that’s why a descriptive name is very helpful)
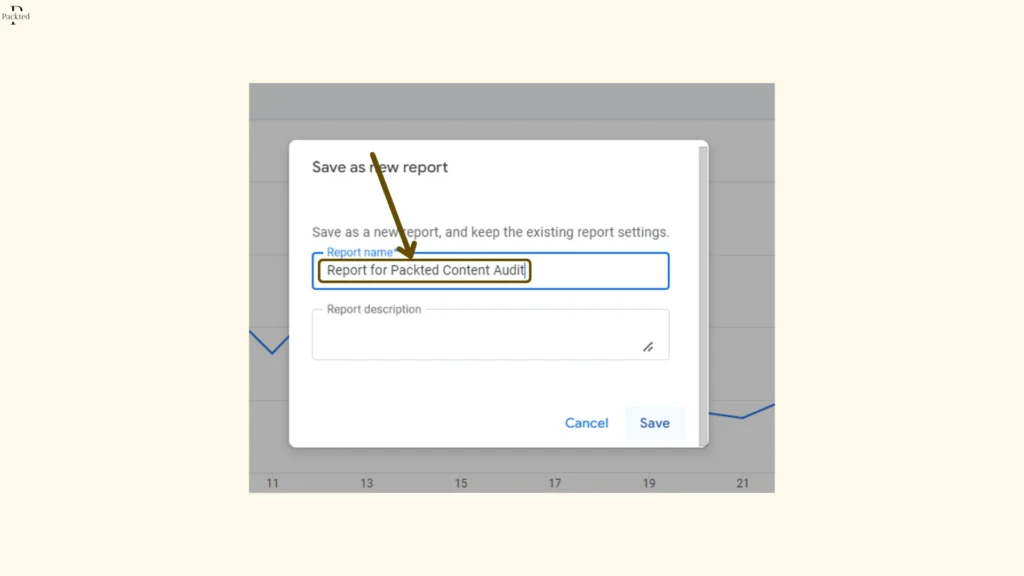
Add any relevant name that you like, and add a description if you think is relevant. Just know that the report description will not show up in the report itself, it will show up in the Library section.
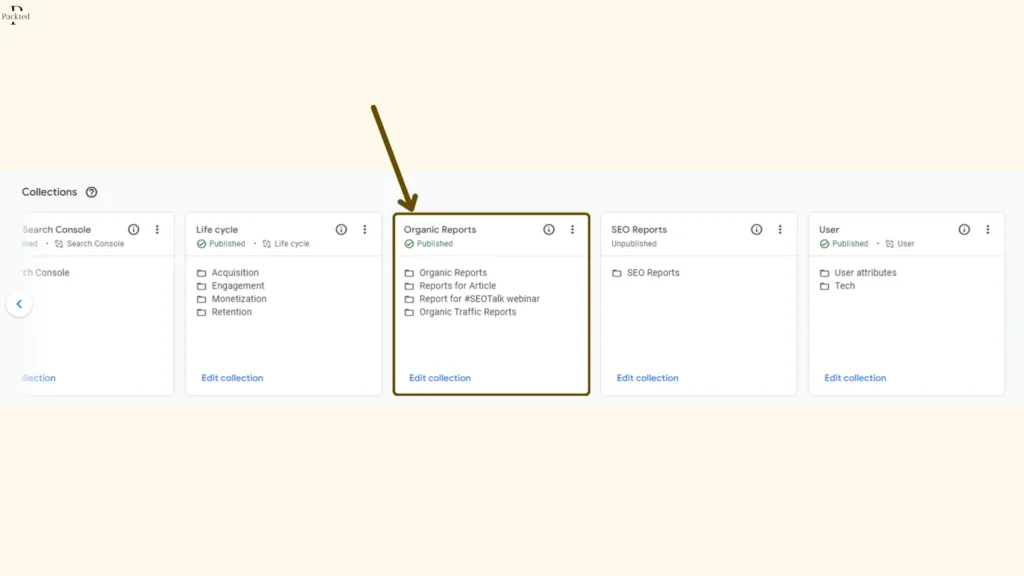
2. After saving, and coming back to the Library section, click on any collection, or make a new collection for all your custom reports. I have run out of all the collections, so I will click on my pre-existing collection, “Organic Reports” and click on Edit Collection
3. Search for your report from the search bar, as shown:
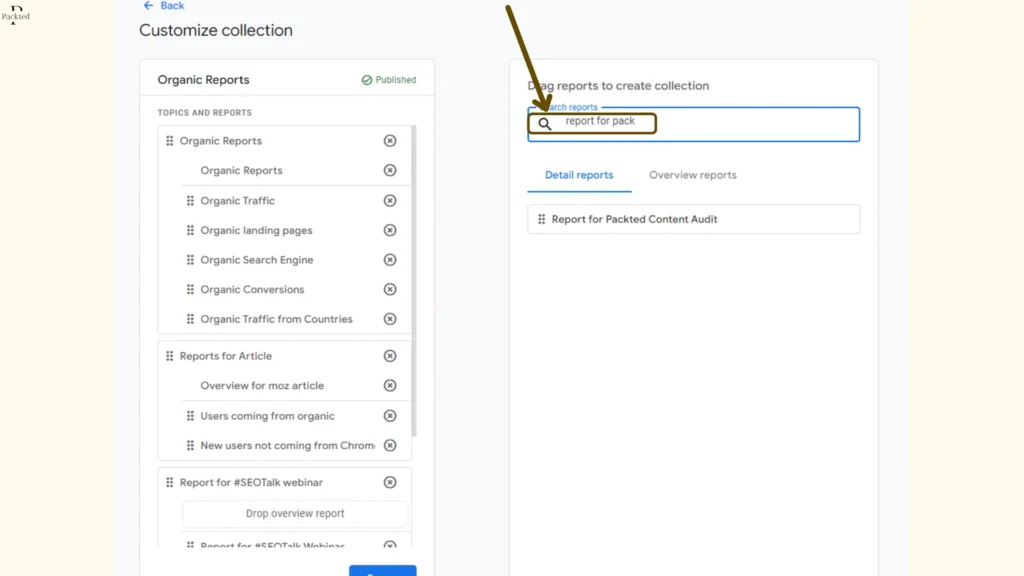
4. Drag this report, and put it somewhere, or “Create a new Topic”, and add the report. After this, click on Save, and “Save changes to current collection”.
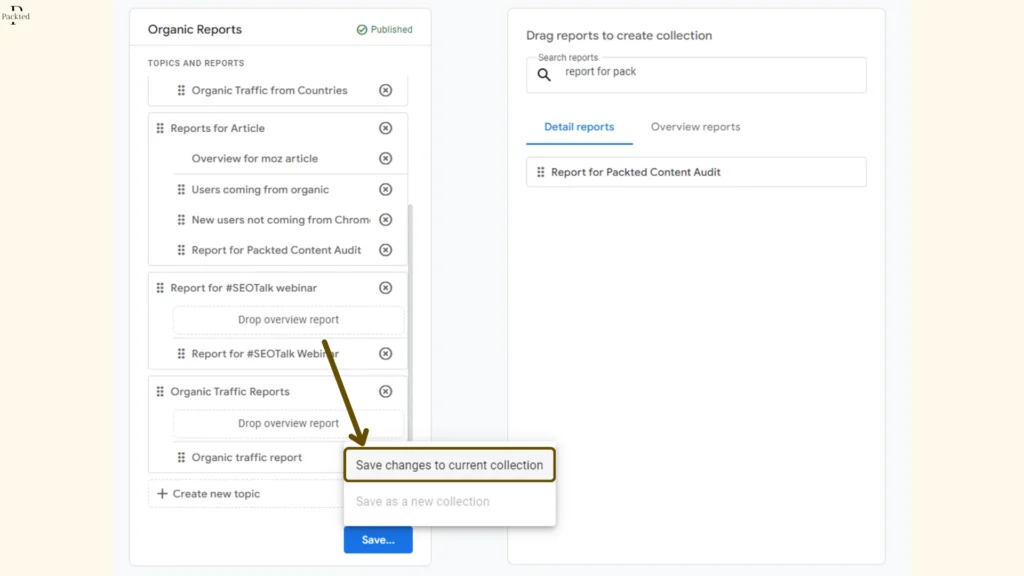
5. Click on back, and after refreshing the GA4, you should see the report in the sidebar.
6. Search and click the report from the main sidebar, and you should see your data
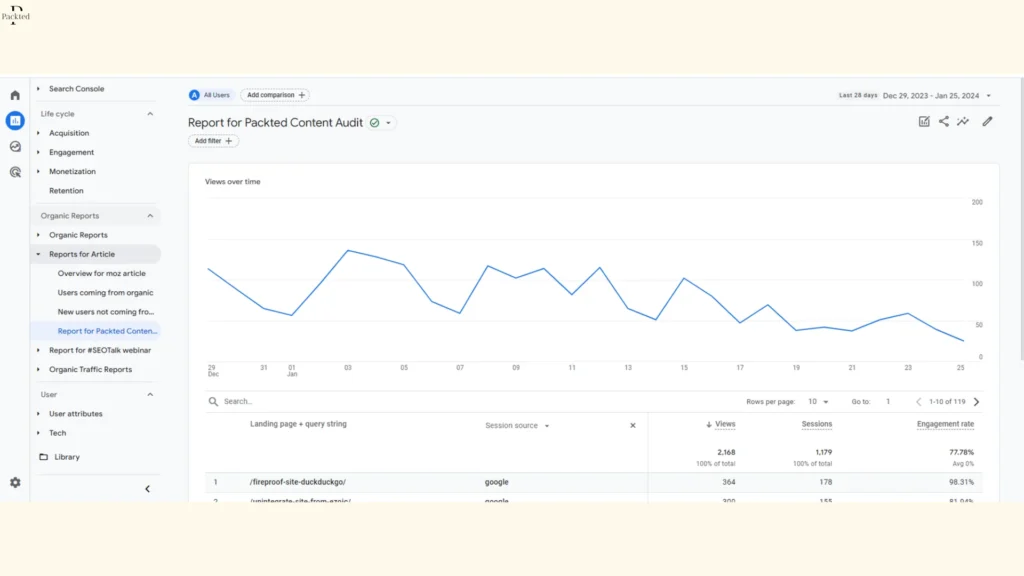
This will be very handy while gathering the data for your content audit or reporting purposes. If you’re looking to get data for a particular page, you can either create a filter or search the search box above the “Landing page + query string” dimension.
Now let’s get back to the audit, shall we?
I will take the slug for the URL I need to analyze, “/seo-resources/” and add it to the search bar. This will give me the data for this particular page, and the traffic sources:

Now all I need to do is copy and paste the metrics from here in the sheet.
💡 Here’s something to consider: When it comes to metrics from GSC and GA4, choose one date range and stick with it. For example, the last 28 days, the last 60 days, or the last 90 days. In my case, I chose 90 days, because I can also choose the last 3 months from GSC, which gives me a fair idea.
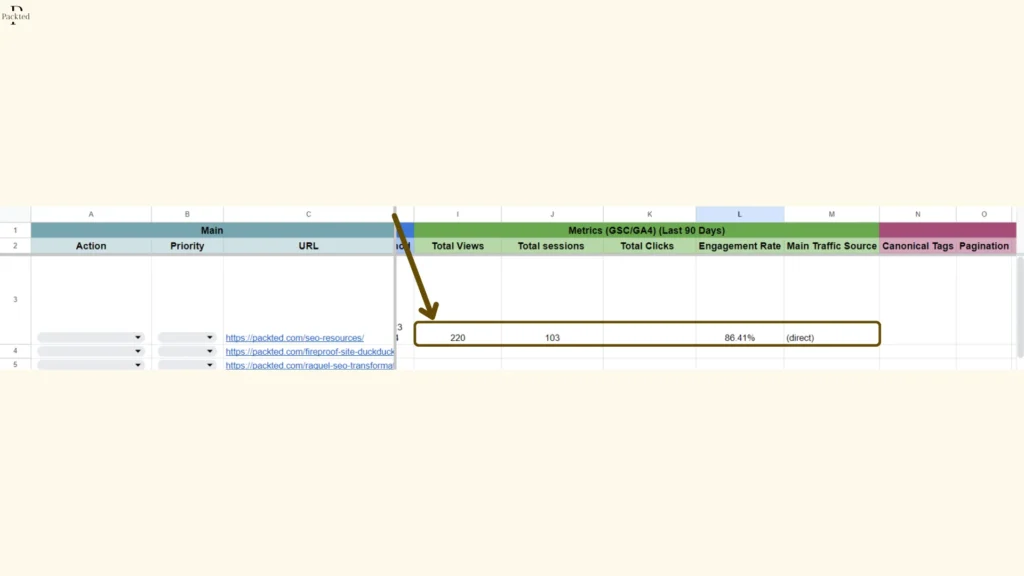
This is how it will look:
Here’s a thing to consider: When you’re exporting the metrics, you should remove the secondary dimension, and then export the data. Apart from this, I think you will have to write the main traffic source yourself. I don’t think there’s any way by which you can find the highest-viewed source for a URL and export it. If you find that, please let me know 🙂
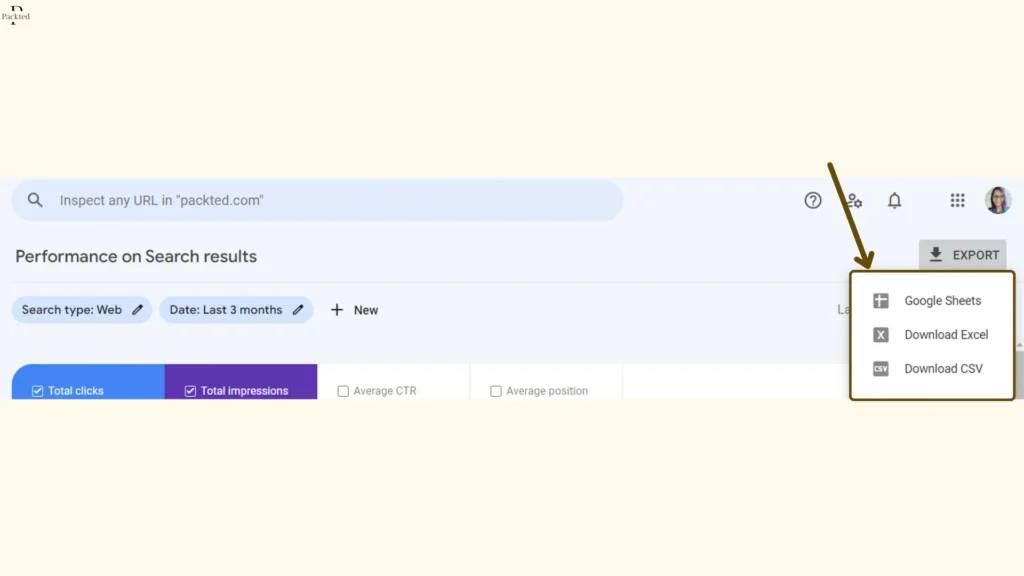
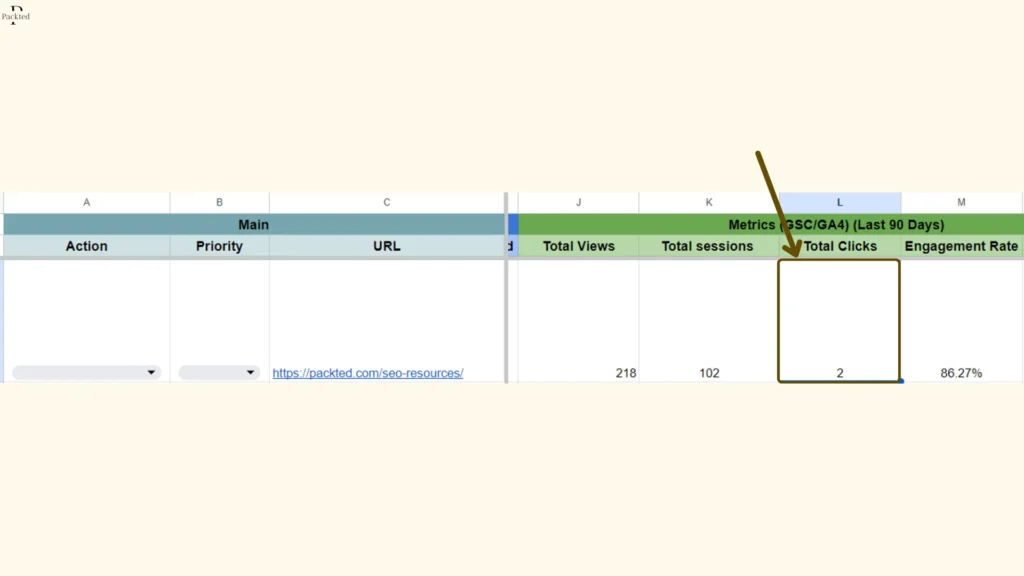
Now I also need to find the clicks for the pages, and this data will come from GSC.
Side Note: I wanted to make a report for the GSC data in the GA4 dashboard. I went ahead and did this experiment, but the result was a bit messy. The problem arises when you want to use the VLOOKUP function to fill the data in the Content Audit sheet. So the best way is to export the data from the GSC. I have shown the steps for it below.
💡To add the data from the custom reports made from GA4 in the Google Sheet in one go, you can export both reports as CSV and then use the VLOOKUP function to get the data.
In my example, I imported the GA4 data in the same file as this content audit, and I named it something simple like “dataexport”.
Let’s say I wanted to add the views, and in the “dataexport” sheet, the views are in the B column, so I added this formula in the content audit sheet, =VLOOKUP(C3, dataexport!A:D, 2, FALSE) Here, C3 has the URL in the content audit sheet, the “dataexport” is the name of the sheet, the “A:D” is the range, the 2 means the column number, and FALSE means that I am looking for an exact match.
You can modify the formula for other columns, and get the data in the sheet. I have found this extremely helpful. (Thanks to ChatGPT for helping me come up with the formula lol)
GSC Data
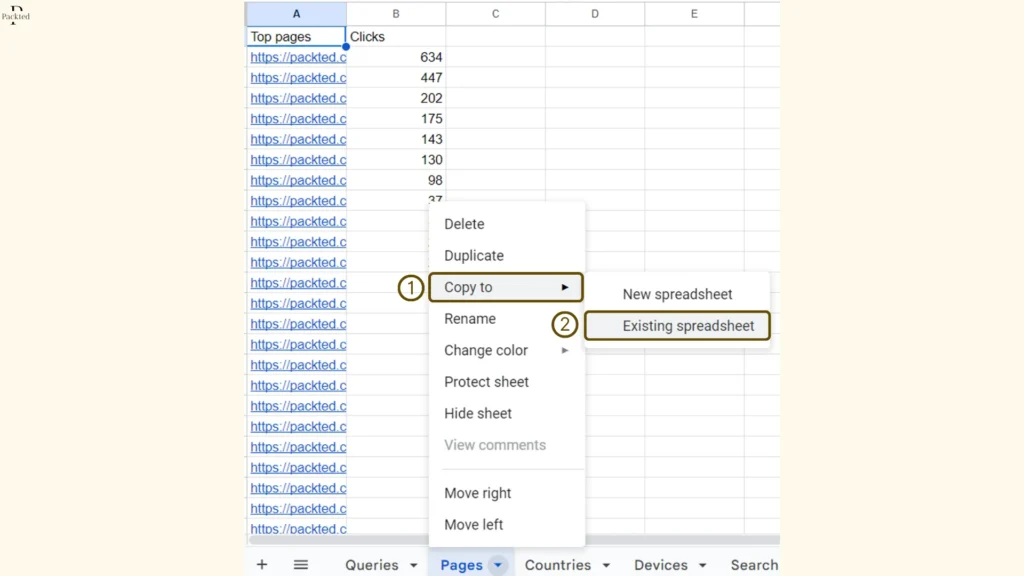
To get this data, go to your GSC property, and click the “Export” button on the Performance report. From here, you will get options for Google Sheets, Excel, and CSV. Whichever option you choose, you still have to do a little cleanup to get the data. I went with the Google Sheets.
After opening the Google Sheet (or any other option), you will notice that you have a lot of data that is not necessary. I went straight to the Pages tab and removed the Impressions, CTR, and Position columns, cause I don’t need them. Now, I copied this to an existing spreadsheet by pasting the link, and I have this page report in the content audit report.
From here, all there’s left to do is to use the VLOOKUP function to get the data.
In the cell that I want to get data, I added this function =VLOOKUP(C3, pagesgsc!A:B, 2, FALSE)
Here, C3 has the URLs, and “pagesgsc” is the name of the sheet. I have added random names because this is case-sensitive. A:B is the range, 2 is the column, and FALSE states that the value needs to be an exact match.
So this is how the data looks now:
Meta Data
Next are the fields like Canonical tags, pagination, Meta title, Meta desc, H1, image alt text, and focus keywords.
You can go the manual route and go to each page and write their data. Or if you have a small website, you can use the free version of Screaming Frog to export the data and use the VLOOKUP to fill the columns.
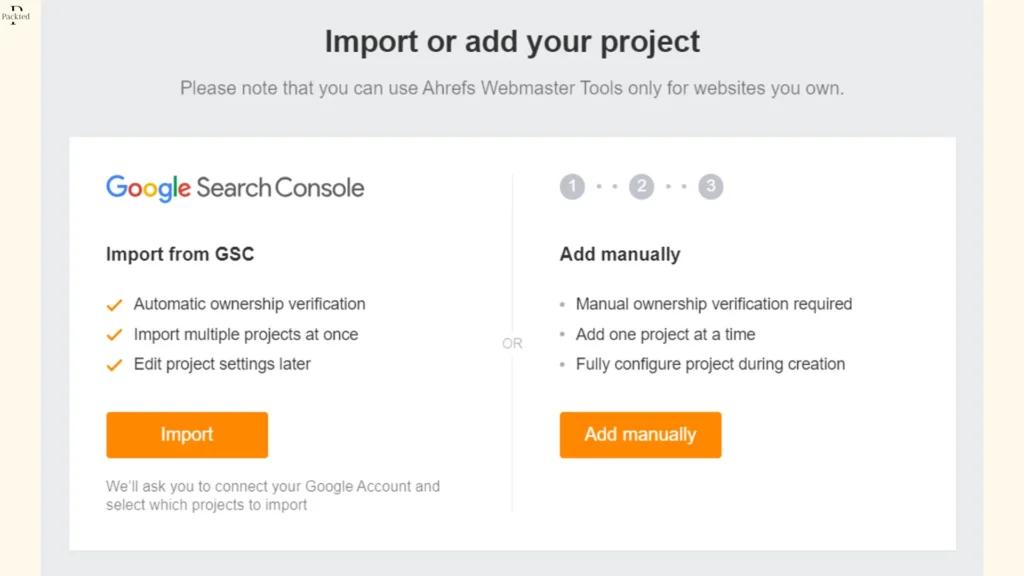
The other way I found extremely helpful is the Ahrefs Webmaster Tools. It is free for anyone who has access to the GSC of a website.
The GSC way is the easiest way to get verified. The other way is to manually verify the ownership of the website. This is a longer and more intensive way, and I would recommend the GSC way.
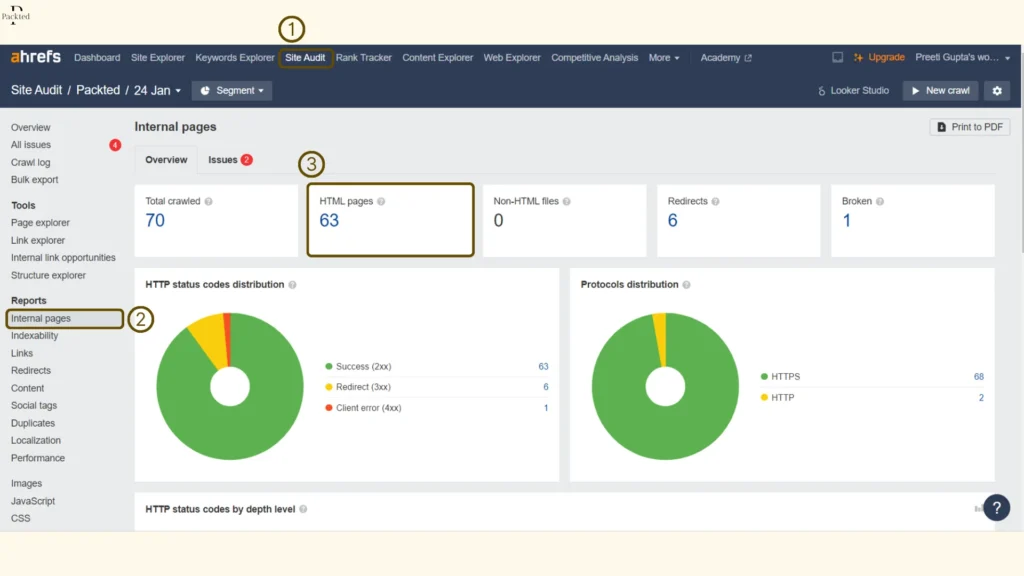
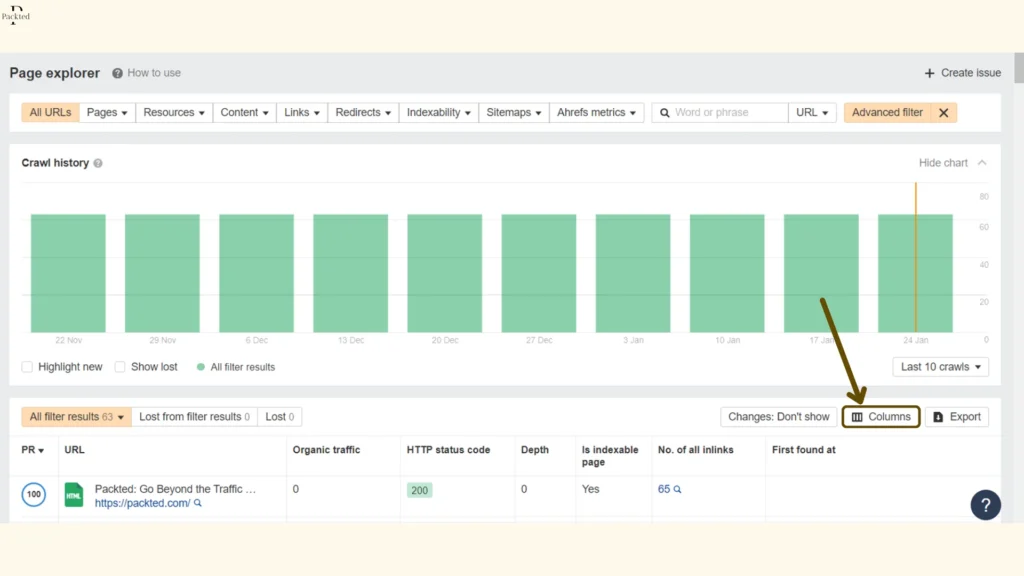
After adding your website, you can run a crawl and after it gets completed, click on Site Audit, select the website you want to audit, and go to the “Internal Pages” report. From there, click on the HTML pages.
This will take you to the Page Explorer report that has some advanced filters. From here, click on “Columns”.
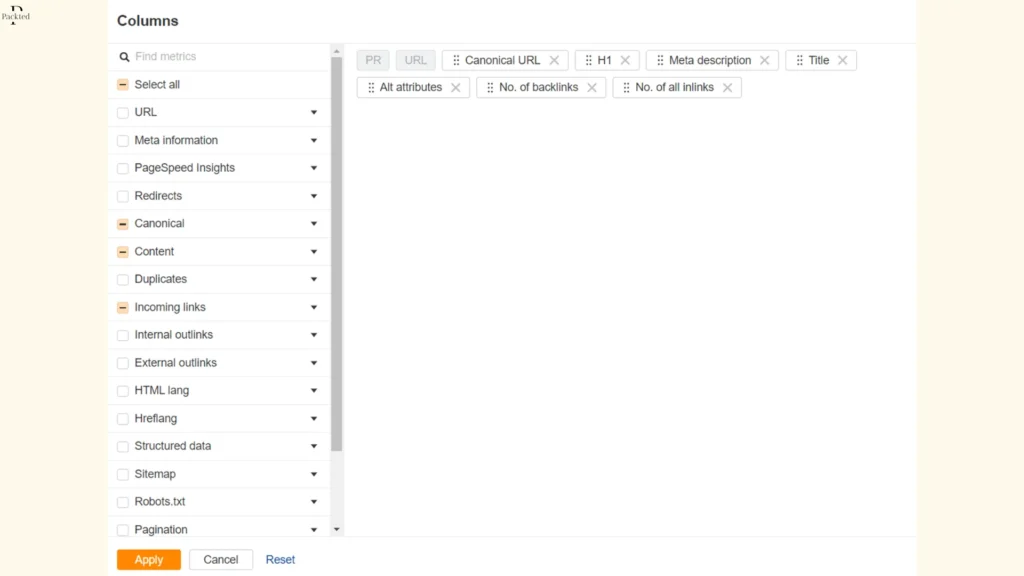
It will show you a bunch of already selected columns, from here, use the search bar, and select all the metrics you want to track. After selecting all your desired columns, here’s how it will look:
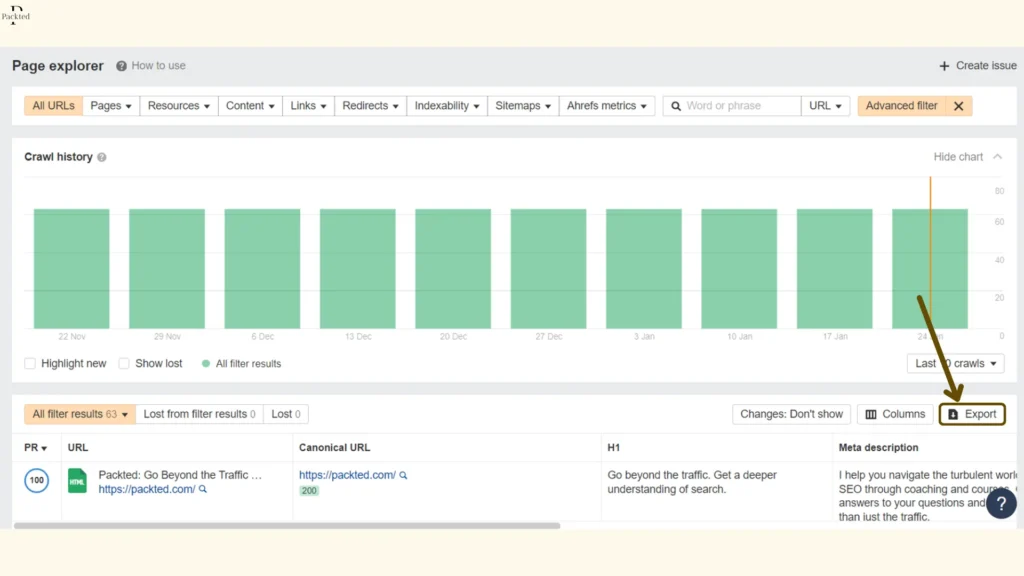
Hit apply and you will see your data. From here, click on export.
After clicking export, you will be presented with the default options. Choose your desired options, and click export.
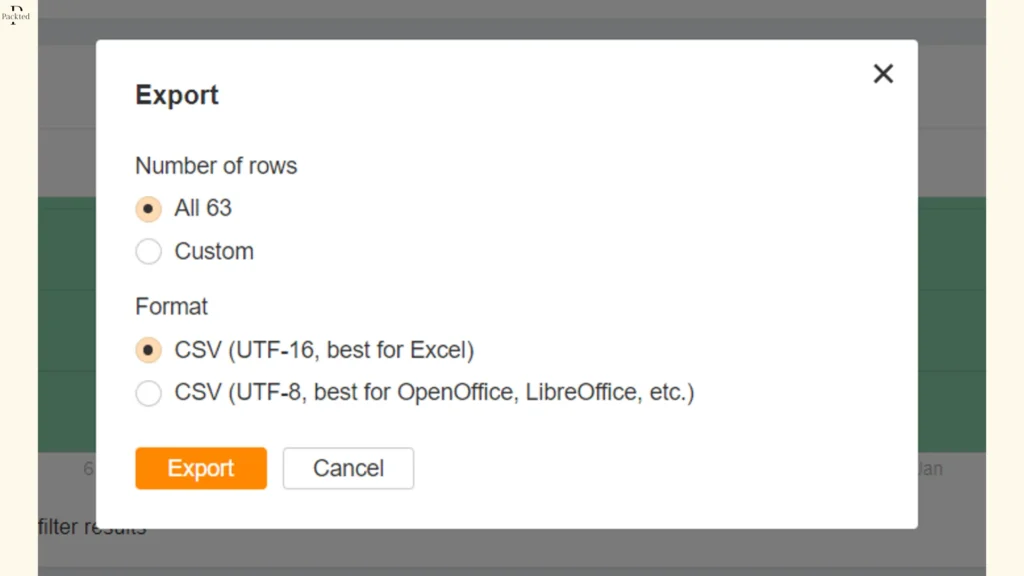
Now the next step is fairly simple. Import this data into a new sheet in the content audit sheet, and use the VLOOKUP function to fill the data.
Focus Keyword/topic
As I have told you earlier in the SERP section, the whole idea behind this is to understand what topic this page is targeting, so that you can use this topic/ keyword for SERP analysis. You can also use this to understand if more than one page is targeting the same topic or not.
This doesn’t have to be perfect. I personally like to add the broader idea as a focus keyword. For example, the first page is titled “Learn SEO With 170+ Free And Paid Resources”.
This is a long title, but if I have to show it as a broad idea, then it would be “Resources to learn SEO”. Notice how this phrase is not included in the title. It is not included in the meta description, or anywhere else in the post. It is only included one time in the intro.
This is a manual step because you will have to understand what topic a page is representing. There could be paid tools that will help you, but taking a manual approach is best in my opinion.
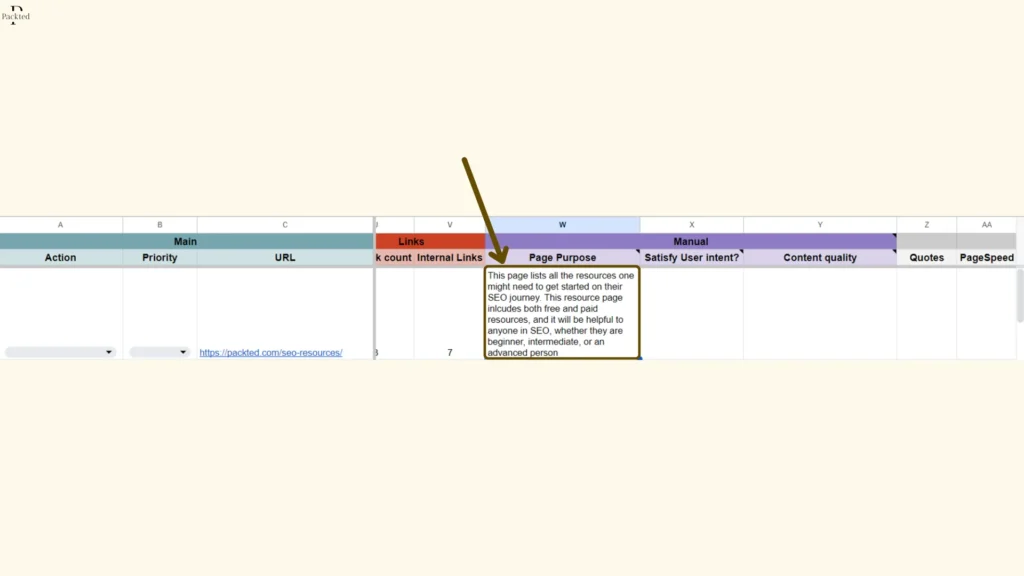
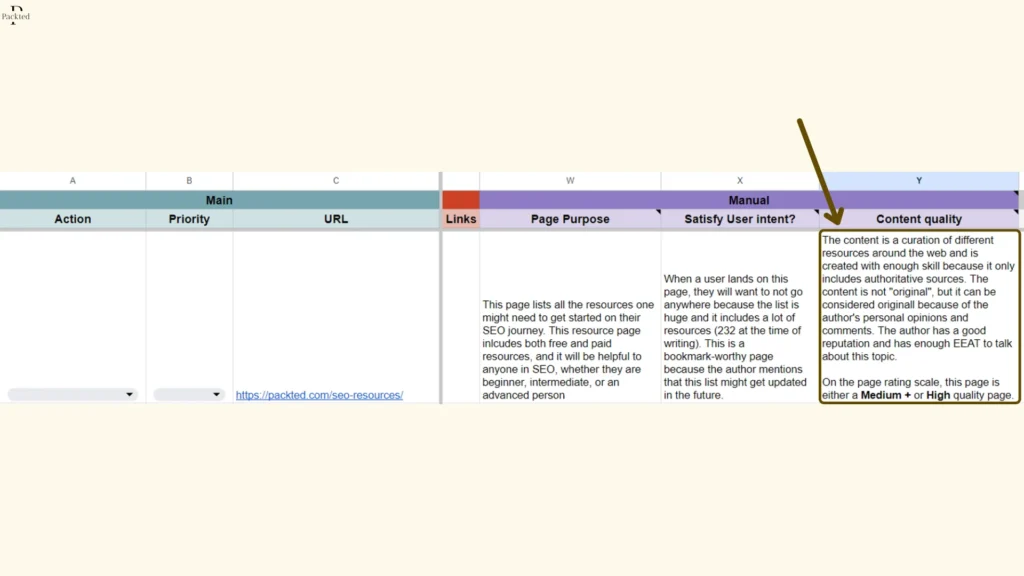
Page’s Purpose
This and the other two columns are for you to put on your “just another internet user” hat and see the site from a regular user perspective. We want to ensure if a user is coming to this page, they understand that we are trying to help them in some way, and the purpose of any particular becomes obvious to them.
If you’re looking to do an even deeper dive, I would highly encourage you to go through this scorecard from Cyrus of Zyppy SEO. You can both fill this out and write the things manually in the audit sheet.
According to Google’s Search Quality Evaluator Guidelines, “The purpose of a page is the reason or reasons why the page was created. Every page on the Internet is created for a purpose, or for multiple purposes. Most pages are created to be helpful for people, thus having a beneficial purpose. Some pages are created merely to make money, with little or no effort to help people. Some pages are even created to harm users.”
The idea behind this is to understand why was this page created.
The guidelines define some common purposes such as:
- To share information about a topic.
- To share a personal experience, perspective, or feelings on a topic.
- To share pictures, videos, or other forms of media.
- To demonstrate a personal talent or skill.
- To express an opinion or point of view.
- To entertain.
- To offer products or services.
- To allow users to post questions for other users to answer.
- To allow users to share files or to download software.
The guidelines advise us to understand both the purpose of the page and the purpose of the website, but for this audit, we will only understand the purpose of a page.
This is how it looks for me.
When we know what the page is about, the next question is to ask, how well it serves the users. And this brings us to the next question:
Does it satisfy the user intent?
When we know the purpose behind a page, it becomes easy to understand if this page serves the users well or not. In this example, the page’s purpose is to list all the resources to learn SEO, so I will scroll through the article and try to read it and understand how well it is helping the users. Do I have an exhaustive list? Am I providing users with enough information? How do other pages look for the same query, and what kind of information are they providing?
Because we are talking about competition research, you might want to go to the SERP again and look at different pages that exist on this topic, see how helpful they are, and compare them to our page.
Our goal should be that users don’t go to another page to help themselves. This means we need to have enough information on this page to help them.
Here’s a tip: Don’t be biased when you’re auditing your own website. I know you like your content and stuff, but right now, we need to evaluate it from a user’s perspective. Another cool thing is that numbers don’t lie. You might feel tempted to not delete this page or do something with it, but when you look at things from a logical standpoint, things become clear.
In my example, I can see that my guide is very comprehensive and it includes 170+ resources (It’s 232 at the time of writing this article). In my analysis of going to SERP and checking different posts is that they have listed all the sources with images, and brief info about each resource. I have not included images cause there will be a lot of images, plus websites change all the time, so it will be hard to update them in the future. I have provided the users with the short info, and sometimes my comments.
Content quality
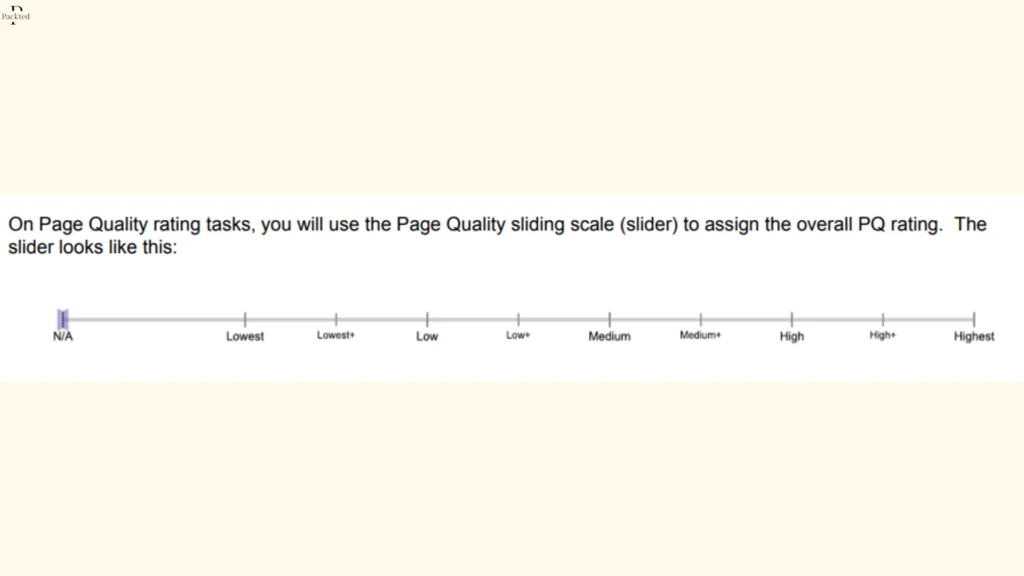
You can think of this concept as similar to the Page Quality Rating concept in the Search Quality Guidelines. Just as how you would assign a page quality rating from Lowest to Highest in the Search Quality tasks, you will do the same here.
The guidelines say that to give a rating, these are the things you should consider:
- The purpose of the page
- The potential for the page or website to cause harm as described in these guidelines
- The topic of the page and the extent to which that topic is YMYL
- The type of the website
- Information provided by the website and content creator
- Quality of the MC (Main Content)
- The title of the page
- The Role of Ads and SC (Supplementary content)
- Reputation of the website and the content creator
- The EEAT of the website
The basic idea is to understand the quality of the content, how much effort was put into the content, and how much EEAT the website and the author have. You can also go deep down and read what each rating means, but here is a short description for all of them:
- Lowest: Lowest quality pages are untrustworthy, deceptive, harmful to people or society, or have other highly undesirable characteristics.
- Low: Low-quality pages do not achieve their purpose well because they are lacking in an important dimension or have a problematic aspect. Low-quality pages do not meet the standards for Lowest but may have similar though milder undesirable characteristics.
- Medium: Medium pages have a beneficial purpose and achieve their purpose. They aren’t anything “special”, but they are not harmful either.
- High: High-quality pages serve a beneficial purpose and achieve that purpose well.
- Highest: Highest-quality pages serve a beneficial purpose and achieve that purpose very well. The distinction between High and Highest is based on the quality of Main Content, the reputation of the website and content creator, and/or E-E-A-T.
This can be a lot considering you have to do this for all pages. If you’re auditing a larger website, then you might choose to audit only the highest-traffic pages or a certain subdirectory. Or you can take a handful of pages from each kind of template.
In my case, I was auditing my whole website because it wasn’t a lot of pages. I always look at the EEAT and the quality of the content. I also see if the content is created with high effort, talent, and skill, and is original or not. This gives me and the client a good understanding of the page.
This is how it’s looking for me:
Remember to be skeptical and not be so lenient about everything.
Other info
Lastly, I like to update my content audit with some extra things. Here’s how they look:
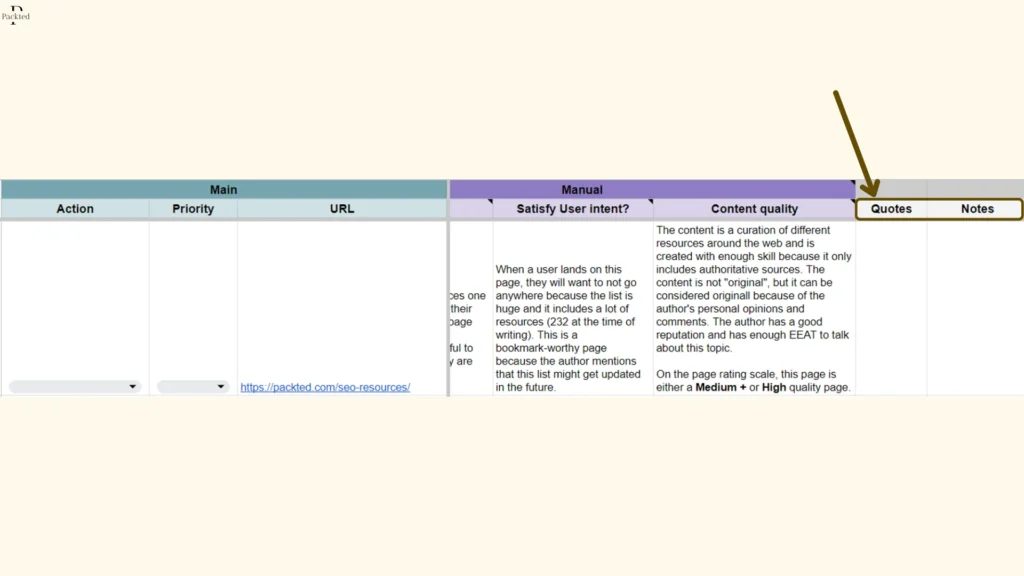
- Quotes: This is specifically for my use case because there are a lot of posts on my website that feature quotes from other awesome people. I will add the names of the people who gave quotes in this column, or write N/A if there aren’t any quotes. You might not need to add this column if your posts don’t include quotes. Similarly, you can add any other additional column here that helps you dig deep down into the audit
- Notes: This is your place to write anything extra that you find on the page. Maybe something was broken, or you didn’t like how something was structured
Once you’re done collecting all the data, it’s time to fill in the first two columns.
Analyze and Prioritize
Once you understand everything about a page, it’s time to assign an action to it. What should happen to this page? Should you keep this page? Should you delete it? This is the time to ask these kinda questions based on the data you collected.
Action
After gathering and going over this data, what do you think should happen with this page? Here are some points I have added to the dropdown menu:
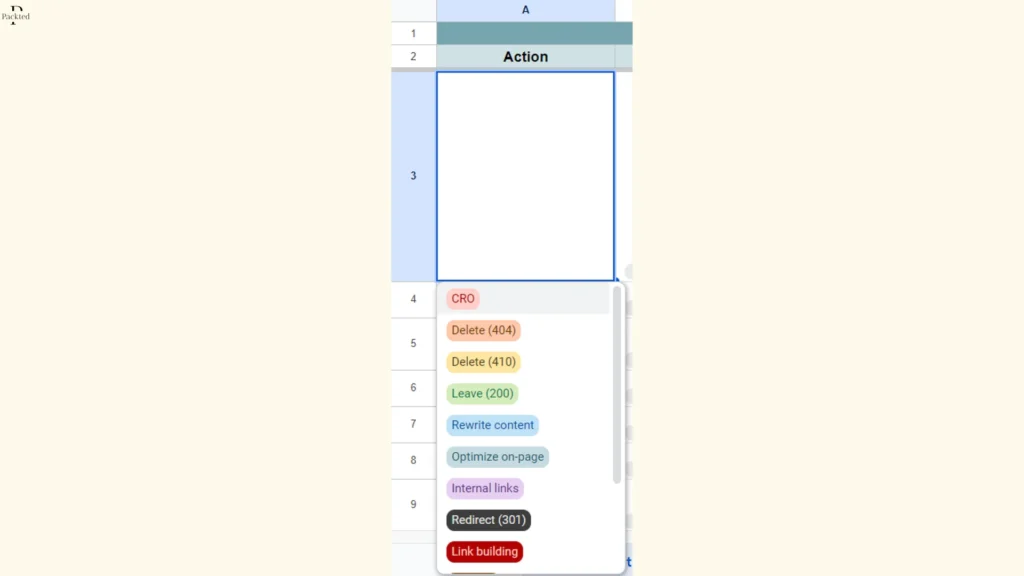
- Optimize for CRO (Conversion Rate Optimization): This includes adding CTA, social proof, or anything that helps users in their buying journey.
- Delete (404): This is a general status code that appears when you delete the content. If this page is deleted temporarily, then this might be a good status code to add. Google will recrawl these URLs and keep them in their systems for 24 hours. However, if you’re deleting pages intentionally, then 410 might be a better choice.
- Delete (410): If this page can’t be redirected to any other page, and you know this page is gone forever and never coming back, then serving a 410 status code is better. Google typically removes these faster from their index because the status code tells them the content is deleted permanently.
- Leave (200): If you think this content is doing fine, and there’s nothing we should worry about, then leave them as it is. Also, if the content is live for less than 6 months, then you should leave this page.
- Rewrite Content: If you think the content is not relevant to the user’s query anymore, or you think there are major changes needed, then it’s a good idea to rewrite the content.
- Expand content: If the existing content is good, but it can be expanded to help the users better, then it’s good to do that. For example, adding more examples, specific use cases, images, and videos, or adding your expert opinion about something.
- Optimize on-page: This means all things related to on-page like headings, titles, meta descriptions, canonical tags, alt text, or something else.
- Add media: If the page will be helpful by adding more images, videos, presentations, and infographics, then you can do that
- Internal links: If the “Internal Links” column shows that this page has fewer internal links, it’s good to add more relevant internal links to help Google and users understand this page better.
- Redirect (301): If this page is not relevant to the users anymore, but there is a similar page that can help the users, then you should redirect this page. If the redirect is temporary, then add the 302, and if the redirect is permanent, then add the 301 redirect.
- Link Building: If a page is good according to the stats, but isn’t performing well, sometimes it just needs a push of links. So you can actively go and build some links to it, or better, create link-worthy and share-worthy content from the very beginning.
- Noindex: Certain pages are not meant to be indexed by the search engines. For example, the thank you pages, internal search pages, or any other page that you don’t want indexed. Some people noindex the category and the tag pages, but if they are bringing traffic to your site, then I don’t think there’s a need to noindex them.
There could be other action items depending on your website and use cases, and you can add those to this list.
For my example, this particular page is doing good, and I don’t need to do anything with it, so I’ll leave (200) this page. And because this page is not as important, I’ll make the priority as normal.
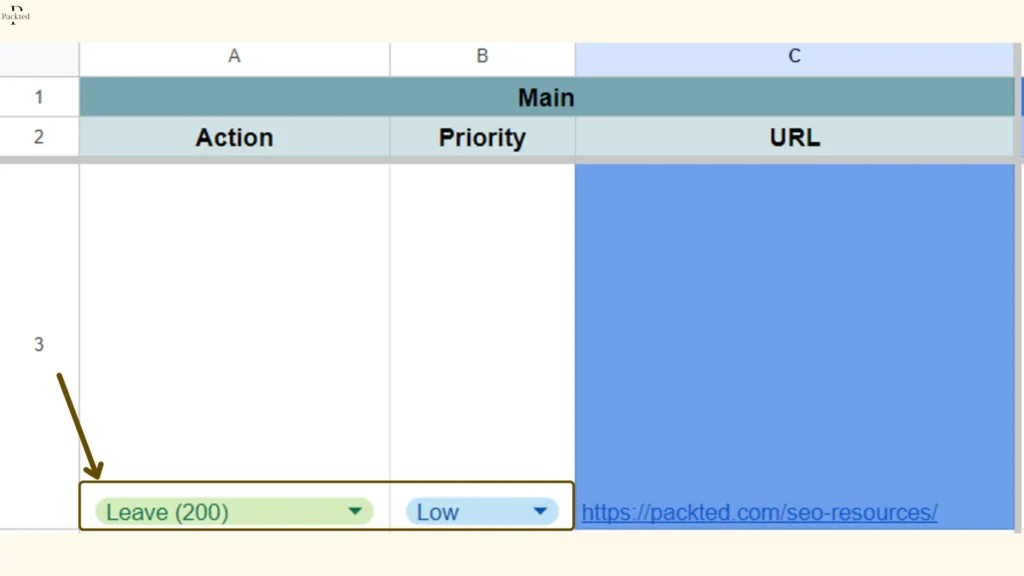
Priority
When you’re doing an audit, it’s natural to find a ton of fixes, but not all fixes are equal. For example, one of the fixes can be to refresh the title tags, and the other is to remove the noindex tag from the important pages. Both are important, but removing the noindex tag from important pages will help make the most impact, and will be aligned with the business impact.
This is because if your home page is noindexed, then it doesn’t matter how awesome your content or your website is. After all, Googlebot can’t see it.
To determine the priority, you can look at things like how much impact it will have on the website and the business, and how much money/ resources it will take to fix it, or more. You can determine the priority based on your goals and the website.
You can then assign them different priorities. For example, critical, high, medium, and low.
You can go one step further and make a separate doc where you outline the actionable steps, their estimated time to fix, and also link to further resources. You can also choose to highlight the good things about the website. This will help the website owner understand what are their strengths.
I made a separate tab in the same sheet for my client where I listed all the issues concerning their priority. I also added a column for status, so that they can track things, and another column like why is this issue important, and any resources, especially developer documentation that will help them or their dev team to verify and fix the issue.
Some people like to deliver a dedicated video that walks them through the audit.
Lastly, I think it’s more of a trial-and-error game. No one on the internet can tell you what will work best for you and your client. You have to do more audits, take feedback, and make them better in the future.
In the end, an audit is supposed to be helpful for both the clients and the users, and it should make an impact on their business or website in some way.
Again, here’s a copy of the content audit sheet template.
Final Words
As you have seen, a content audit is a way for you to highlight any issues with the content of your website. Typically this document also includes the prioritization and any extra resources that will help the client implement the recommendations on their own. In this audit, I have measured things like page type, funnel stage, GA4 metrics, GSC metrics, user experience metrics, how the SERP looks, and more. This ensures that the client understands not just the website, but they get a holistic picture of how they can make their website better for their users.